Thursday, 29 April 2010
Edward Weston - Books
Books on Edward Weston, and in particular his landscape images are not easy to find in the UK. In the USA the second hand book market does seem to have more for sale but the cost is high and postage to the UK is as much as the book. I have found an on line resource that has solved the initial problem of " what does his work actually look like". The University of Arizona has a website entitled "Center for creative arts" and can be found at http://www.ir.uair.arizona.edu/ccp/ They hold a collection of nearly 3000 images of Weston and the same for Ansel Adams. I had no intention of looking at Ansel Adams as my chosen photographer, but having now looked at his landscape work away from the famous Yosemite images I am once again drawn to him. Weston and Adams were of course good friends for many years and formed, with others the f64 group.
Tuesday, 27 April 2010
Reading.
Currently reading.
My route to Photography 2 was via APEL and while I am pleased that my previous work and experience satisfied the requirements of the university I still consider that there is a need to read this book and cement together some of the exercises that I would have encountered in The Art of Photography. In addition, Michael Freeman often refers to these in the Landscape course text and makes the assumption that you will have done the level 1 course. The book is by no means basic, if that is what is implied by being level 1. I don't intend to read it from cover to cover, but I am dipping in and out to chapters that look of particular interest and where Freeman refers me to TAOP exercises. Design basics and graphic elements have always been of particular interest to me. Working in civil engineering I see shapes and lines in every aspect of the built environment and take this further into the world of natural history and landscape. Looking at these chapters, remembering the concepts and taking them into the field is not always easy. Photography, like any design process, (architecture, civil engineering, naval architecture and structural design) has the ability to return output, that without recourse to any formulae either looks good or bad. The old saying "If it looks right then it probably is" is certainly how I make my final edit and selection of work. We cannot of course rely entirely upon intuition and Freeman talks about this in Chapter 6 describing how Andre Kertesz "was simply not interested in examining his own process". Others (Ansel Adams, Walker Evans, Edward Weston etc) did and I am inclined to think that their approach to refinement is more appropriate. I gain some comfort from Edward Weston who wrote " that for photography, landscape was too chaotic.... to crude and lacking in arrangement". A comment like this from someone like Weston is comforting, when I cannot find that elusive composition. Weston however intrigues me.
Landscape within - David Ward
This book is not amongst the list of recommended reading, but is by one of the UK's leading contemporary landscape photographers. The book is not written for those who want a "how to" book in the general sense, although one chapter does talk of some useful techniques.This book is of course about landscape photography, but asks the reader to consider it at a deeper level. Photography of the landscape is investigated through Ward's love of writing (and some stunning photographs) and questions our motives for landscape photography. In the introduction he states " What you need to cultivate first and foremost in photography is, I believe, your vision; you need to train yourself to really see, not just glance around you but to concentrate totally on your surroundings". I have taken this thought with me when shooting, and try to slow down the tempo, look closer, look deeper, sit, stand longer before either taking a shot or moving on. Ward also asks us to look closer at the landscape, not macro photography, but what is closer to your feet, what is all around us but often ignored. Within this closer world lies an opportunity to photograph an intimate landscape that will produce a unique image. Once again, these thoughts travel with me when out shooting, hindered only by my ability to match my expectation with results. A book I will read and re read from cover to cover.
Edward Weston - His Life by Ben Maddow
I find Edward Weston's work interesting although sometimes difficult to see as a body of work, due to the diverse subject matter he works with. This nagging away in my head and the need to produce some assignment work later based upon a photographer from a short list, I came across this biography. The book is heavy going, mainly because the author is mixing his own text with the day books/journals of Weston to tell the story and having only got part way through the whole picture is not easy to interpret.I think I would prefer to read a biography or just the day books. I am of course (at this juncture) interested in his landscape work and this as yet has not been covered. I do need to continue with this, get some more books (although the large image books seem rare and second hand cost £100) and really get to the bottom of this man. My alternative is to park up Weston, concentrate of Fay Godwin for the assignments (perceived as easier to emulate etc) and maybe come back to him later. There is no need to abandon this yet as this will not be relevant for at least 3 months.
- The Photographers Eye by Michael Freeman
- Landscape within by David Ward
- Edward Weston - His Life by Ben Maddow
My route to Photography 2 was via APEL and while I am pleased that my previous work and experience satisfied the requirements of the university I still consider that there is a need to read this book and cement together some of the exercises that I would have encountered in The Art of Photography. In addition, Michael Freeman often refers to these in the Landscape course text and makes the assumption that you will have done the level 1 course. The book is by no means basic, if that is what is implied by being level 1. I don't intend to read it from cover to cover, but I am dipping in and out to chapters that look of particular interest and where Freeman refers me to TAOP exercises. Design basics and graphic elements have always been of particular interest to me. Working in civil engineering I see shapes and lines in every aspect of the built environment and take this further into the world of natural history and landscape. Looking at these chapters, remembering the concepts and taking them into the field is not always easy. Photography, like any design process, (architecture, civil engineering, naval architecture and structural design) has the ability to return output, that without recourse to any formulae either looks good or bad. The old saying "If it looks right then it probably is" is certainly how I make my final edit and selection of work. We cannot of course rely entirely upon intuition and Freeman talks about this in Chapter 6 describing how Andre Kertesz "was simply not interested in examining his own process". Others (Ansel Adams, Walker Evans, Edward Weston etc) did and I am inclined to think that their approach to refinement is more appropriate. I gain some comfort from Edward Weston who wrote " that for photography, landscape was too chaotic.... to crude and lacking in arrangement". A comment like this from someone like Weston is comforting, when I cannot find that elusive composition. Weston however intrigues me.
Landscape within - David Ward
This book is not amongst the list of recommended reading, but is by one of the UK's leading contemporary landscape photographers. The book is not written for those who want a "how to" book in the general sense, although one chapter does talk of some useful techniques.This book is of course about landscape photography, but asks the reader to consider it at a deeper level. Photography of the landscape is investigated through Ward's love of writing (and some stunning photographs) and questions our motives for landscape photography. In the introduction he states " What you need to cultivate first and foremost in photography is, I believe, your vision; you need to train yourself to really see, not just glance around you but to concentrate totally on your surroundings". I have taken this thought with me when shooting, and try to slow down the tempo, look closer, look deeper, sit, stand longer before either taking a shot or moving on. Ward also asks us to look closer at the landscape, not macro photography, but what is closer to your feet, what is all around us but often ignored. Within this closer world lies an opportunity to photograph an intimate landscape that will produce a unique image. Once again, these thoughts travel with me when out shooting, hindered only by my ability to match my expectation with results. A book I will read and re read from cover to cover.
Edward Weston - His Life by Ben Maddow
I find Edward Weston's work interesting although sometimes difficult to see as a body of work, due to the diverse subject matter he works with. This nagging away in my head and the need to produce some assignment work later based upon a photographer from a short list, I came across this biography. The book is heavy going, mainly because the author is mixing his own text with the day books/journals of Weston to tell the story and having only got part way through the whole picture is not easy to interpret.I think I would prefer to read a biography or just the day books. I am of course (at this juncture) interested in his landscape work and this as yet has not been covered. I do need to continue with this, get some more books (although the large image books seem rare and second hand cost £100) and really get to the bottom of this man. My alternative is to park up Weston, concentrate of Fay Godwin for the assignments (perceived as easier to emulate etc) and maybe come back to him later. There is no need to abandon this yet as this will not be relevant for at least 3 months.
Saturday, 24 April 2010
Norfolk Field
The need for images has never been greater. Spring has now arrived, although it was -2c last night and the Assignment 1 must be shot. This process continues, but during time at the PC I have wandered into a number of possibilities in presentation, style, post process etc.most of which can be left alone or at least returned to for other uses. This photograph I am unsure about. I am not convinced that it has any merit but I keep coming back to it. I publish it here so that it is easier to look at outside the context of CS3 and maybe that will help.

Wednesday, 14 April 2010
Landscape - Project 5 - Interacting subjects
Project 5 explores the possibilities of a single subject and requires a variety of composition and view point, using the same lens. For this exercise I had originally shot a series at Caste Acre Priory, but later rejected these on the grounds of insufficient variety. The location for the series below is Bawsey St James church. The only remains of a village dating to the Anglo Saxon period and visited by Channel 4 Time Team in March 1999.
To shoot the series I used the D3 with a 35mm f1.4 manual focus lens. The day was an amazingly clear Spring day without a cloud in the sky. Clouds would have offered some interest in the otherwise plain blue, however due to the small physical size of the church, the silhouette against a plain sky allows the subject to remain the centre of interest, even when at a distance.

To shoot the series I used the D3 with a 35mm f1.4 manual focus lens. The day was an amazingly clear Spring day without a cloud in the sky. Clouds would have offered some interest in the otherwise plain blue, however due to the small physical size of the church, the silhouette against a plain sky allows the subject to remain the centre of interest, even when at a distance.
The road leading up the small hill has a S shape curve and is fenced both sides with simple post and wire. The choices here are explored in Photographs 1 - 5. The church remains small in the frame and the emphasis is on the road and fence. Small changes in viewpoint had a major impact on composition. The horizon with its curved line allowed me to balance the composition with a number of options. Position of the horizon once again being important. Large foregrounds only work when there is some interest by way of texture or detail. Although similar in many respects they all have sufficient differences to allow further selection.


No 6 takes an entirely simplistic form, allowing the church to move to the centre and reduces the foreground. The overt amount of plain sky is always going to happen with a vertical format and the small foreground. In this instance the sky with its natural gradation to very deep blue is important as it offers balance and adds to the symmetry.


For No 7 and 8 I have moved in closer and we see more of the detail of the building, especially in No 8, where the frame is filled and the aspect ration changed a small amount to allow the building fit in the frame, and form a tighter composition.

For No 10 I moved down the slope and deliberately put the main subject out of focus, by limiting the depth of field. The small flower becoming the point of interest.


In No 11 and 13 I moved away by a considerable distance. No 11 is perhaps not the strongest of images, but is included for that purpose. No 13 reduces the church to almost a spec on the horizon. The strong diagonal of the river takes over and actually leads the eye away from the building, so again, while interesting, and fulfilling the brief to the maximum, is of little use.
Conclusion.
In normal practice it is unlikely that I would be working with only one lens. However for the project that was all I was allowed (the choice which one was mine), and to a degree it was interesting. This coupled with the choice and availability of viewpoints, created some shots that were more novelty than useful and that explains the omission of some photographs from the numbering sequencing. The lack of lens choice was crucial and knowing that no changes could be made once I had started, took the emphasis away from the camera, and I spent more time having to think about opportunity and viewpoint.
Tuesday, 13 April 2010
Desk tidying 2 - more post it notes removed
Workflow for hand colouring effect
- Use full colour image
- Make 2 duplicate layers
- Layer 1 - desaturate using channel mixer and rename monochrome
- Increase contrast on layer 1
- Layer 2 - Apply gausian blur to 18 pixels and rename blur
- Blend using overlay
- Reduce colour by opacity
- Add adjustment layer with photo filter to add background tone via density slider
Desk tidying - post it notes removed
The various pieces of paper around the keyboard are annoying me. They will be destroyed just as soon as I have made a note hear.
Prep in NX2
Neutral for CS3 preset is
Prep in NX2
Neutral for CS3 preset is
- 5200
- Pic control to Neutral
- All sharpening off
- D Light off
- Save as 16 bit tiff
- Open in CS3
- Levels
- then to AS for velvia if needed
- +- opacity
- flatten
- 20.60.4 F11
- plus maybe 81 filter
- Dust bunnies + any extra clone and curves
- Check sharpening but do not apply
- Save large tiff (print sharpening later in Qimage)
- Size at 9x6x300
- Save jpg for web with suitable usm
- 5px black stroke on inside
- Canvas +1 all round
- Border colour 0,0,51,129,129,129
- Text white bold Tahoma
Wednesday, 7 April 2010
New accessory
During the last few weeks I have laid on my stomach too may times to produce low viewpoint photographs. Its dirty, wet and people around you think you are mad. The answer is a right angle finder. The DR-5 fits to the D3 eyepiece and allows me to use the camera in a altogether more dignified way when working below waist height. It will also be useful in the studio when the camera is being used above the subject. Being comfortable when shooting, whether its warm dry clothes, heat in the studio or just simply having to be a contortionist makes a huge contribution to the quality of my work and this will be a good investment.
This what it looks like.
http://www.nikonusa.com/Find-Your-Nikon/Product/Viewfinders/4752/DR-5-Rectangular-Right-Angle-Finder.html
This what it looks like.
http://www.nikonusa.com/Find-Your-Nikon/Product/Viewfinders/4752/DR-5-Rectangular-Right-Angle-Finder.html
Monday, 5 April 2010
HDR - Software Testing
I took some time today to look at HDR and Tone Mapping. Michael Freeman has an interesting section on his website and it seemed the time to have a look at a technique that has become fashionable in recent months. I had looked at HDR a while ago, and used CS3 with absolutely no success. The results were horrible, and as I had no immediate need for the technique I had left it alone. A while ago I had to shoot some hotel room interiors with a massive DR. In that instance I had made 2 exposures, laid one over the other and with a mask and soft brush blended the two as one. The result again was not that good. So, with Landscapes on the agenda, and the possibility of future difficult interiors I returned to the subject.
Photomatix is specialist software for this purpose and seems to offer plenty of control, for "normal" HDR output. I say normal because much of what I have seen in the past has a "painterly" look that cinematographers are using in film making where CGI is involved. All I want is the ability to overcome the constraints of the CCD in my camera. Most CCDs can only see about 4.5 stops of DR. The human eye can adjust itself to see a range of 24 stops.
HDR software uses a number ( say 5 for most situations) of frames of the same image, all with a different exsposure and combines them as one. Typically the bracketed frames will be at -2, -1, 0, +1, +2 stops.
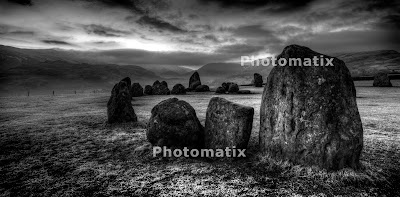
I had taken a few bracketed sequences of Castlerigg Stone Circle, but only 3, -1, 0, +1
This image is my first attempt and in monochrome.
Photomatix is specialist software for this purpose and seems to offer plenty of control, for "normal" HDR output. I say normal because much of what I have seen in the past has a "painterly" look that cinematographers are using in film making where CGI is involved. All I want is the ability to overcome the constraints of the CCD in my camera. Most CCDs can only see about 4.5 stops of DR. The human eye can adjust itself to see a range of 24 stops.
HDR software uses a number ( say 5 for most situations) of frames of the same image, all with a different exsposure and combines them as one. Typically the bracketed frames will be at -2, -1, 0, +1, +2 stops.
I had taken a few bracketed sequences of Castlerigg Stone Circle, but only 3, -1, 0, +1
This image is my first attempt and in monochrome.

Notes for future work:-
- Use the 5 shot auto bracket set up from -2 to +2 and shoot on high speed multi frame setting. If not, as the clouds move there are issues with registering the images.
- Always use A priority so that shutter speed is varied and not f stop. This ensures constant depth of field and in focus elements are easier to register.
- Always use the tripod.
- Continue to use the ND graduated filters as these will help the highlights.
The watermarks are due to it being a trial version
Subscribe to:
Comments (Atom)