- Use full colour image
- Make 2 duplicate layers
- Layer 1 - desaturate using channel mixer and rename monochrome
- Increase contrast on layer 1
- Layer 2 - Apply gausian blur to 18 pixels and rename blur
- Blend using overlay
- Reduce colour by opacity
- Add adjustment layer with photo filter to add background tone via density slider
Tuesday, 13 April 2010
Desk tidying 2 - more post it notes removed
Workflow for hand colouring effect

Desk tidying - post it notes removed
The various pieces of paper around the keyboard are annoying me. They will be destroyed just as soon as I have made a note hear.
Prep in NX2
Neutral for CS3 preset is
Prep in NX2
Neutral for CS3 preset is
- 5200
- Pic control to Neutral
- All sharpening off
- D Light off
- Save as 16 bit tiff
- Open in CS3
- Levels
- then to AS for velvia if needed
- +- opacity
- flatten
- 20.60.4 F11
- plus maybe 81 filter
- Dust bunnies + any extra clone and curves
- Check sharpening but do not apply
- Save large tiff (print sharpening later in Qimage)
- Size at 9x6x300
- Save jpg for web with suitable usm
- 5px black stroke on inside
- Canvas +1 all round
- Border colour 0,0,51,129,129,129
- Text white bold Tahoma
Wednesday, 7 April 2010
New accessory
During the last few weeks I have laid on my stomach too may times to produce low viewpoint photographs. Its dirty, wet and people around you think you are mad. The answer is a right angle finder. The DR-5 fits to the D3 eyepiece and allows me to use the camera in a altogether more dignified way when working below waist height. It will also be useful in the studio when the camera is being used above the subject. Being comfortable when shooting, whether its warm dry clothes, heat in the studio or just simply having to be a contortionist makes a huge contribution to the quality of my work and this will be a good investment.
This what it looks like.
http://www.nikonusa.com/Find-Your-Nikon/Product/Viewfinders/4752/DR-5-Rectangular-Right-Angle-Finder.html
This what it looks like.
http://www.nikonusa.com/Find-Your-Nikon/Product/Viewfinders/4752/DR-5-Rectangular-Right-Angle-Finder.html
Monday, 5 April 2010
HDR - Software Testing
I took some time today to look at HDR and Tone Mapping. Michael Freeman has an interesting section on his website and it seemed the time to have a look at a technique that has become fashionable in recent months. I had looked at HDR a while ago, and used CS3 with absolutely no success. The results were horrible, and as I had no immediate need for the technique I had left it alone. A while ago I had to shoot some hotel room interiors with a massive DR. In that instance I had made 2 exposures, laid one over the other and with a mask and soft brush blended the two as one. The result again was not that good. So, with Landscapes on the agenda, and the possibility of future difficult interiors I returned to the subject.
Photomatix is specialist software for this purpose and seems to offer plenty of control, for "normal" HDR output. I say normal because much of what I have seen in the past has a "painterly" look that cinematographers are using in film making where CGI is involved. All I want is the ability to overcome the constraints of the CCD in my camera. Most CCDs can only see about 4.5 stops of DR. The human eye can adjust itself to see a range of 24 stops.
HDR software uses a number ( say 5 for most situations) of frames of the same image, all with a different exsposure and combines them as one. Typically the bracketed frames will be at -2, -1, 0, +1, +2 stops.
I had taken a few bracketed sequences of Castlerigg Stone Circle, but only 3, -1, 0, +1
This image is my first attempt and in monochrome.
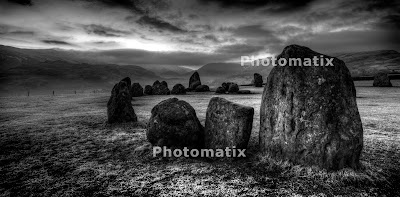
Photomatix is specialist software for this purpose and seems to offer plenty of control, for "normal" HDR output. I say normal because much of what I have seen in the past has a "painterly" look that cinematographers are using in film making where CGI is involved. All I want is the ability to overcome the constraints of the CCD in my camera. Most CCDs can only see about 4.5 stops of DR. The human eye can adjust itself to see a range of 24 stops.
HDR software uses a number ( say 5 for most situations) of frames of the same image, all with a different exsposure and combines them as one. Typically the bracketed frames will be at -2, -1, 0, +1, +2 stops.
I had taken a few bracketed sequences of Castlerigg Stone Circle, but only 3, -1, 0, +1
This image is my first attempt and in monochrome.

Notes for future work:-
- Use the 5 shot auto bracket set up from -2 to +2 and shoot on high speed multi frame setting. If not, as the clouds move there are issues with registering the images.
- Always use A priority so that shutter speed is varied and not f stop. This ensures constant depth of field and in focus elements are easier to register.
- Always use the tripod.
- Continue to use the ND graduated filters as these will help the highlights.
The watermarks are due to it being a trial version
Subscribe to:
Posts (Atom)